The Importance of Transcripts
Applies to the following areas:
|
|
Overview
Videos, interactives, podcasts, and multimedia used in UAGC courses and websites should include captioning and transcription. Captions are text versions of speech and other crucial audio content. A transcript is the non-synchronized text of the audio material provided adjacent to the video or audio file. Videos placed on the UAGC YouTube site are subject to review and require accurate captions and transcription that meets UAGC Video Guidelines.
Transcript Types for Accessibility What Is Needed for Transcripts to Meet Accessibility Criteria | Steps to Make an Accessible Transcript Preparing Visuals to Be Incorporated Into Captions and Transcripts |
Transcript Types for Accessibility
Like captions, transcripts provide equal access and benefit people with hearing impairments, non-native language speakers, and anyone in a noisy environment. They serve as an additional learning tool and are searchable.
- Basic transcripts provide the text version of audio content in a video.
- Descriptive transcripts provide a text version of a video that includes all the audio and visual information needed to understand the content. A descriptive transcript combines text and audio description to interpret all information provided. This includes all onscreen text and descriptions of all relevant items pictured.
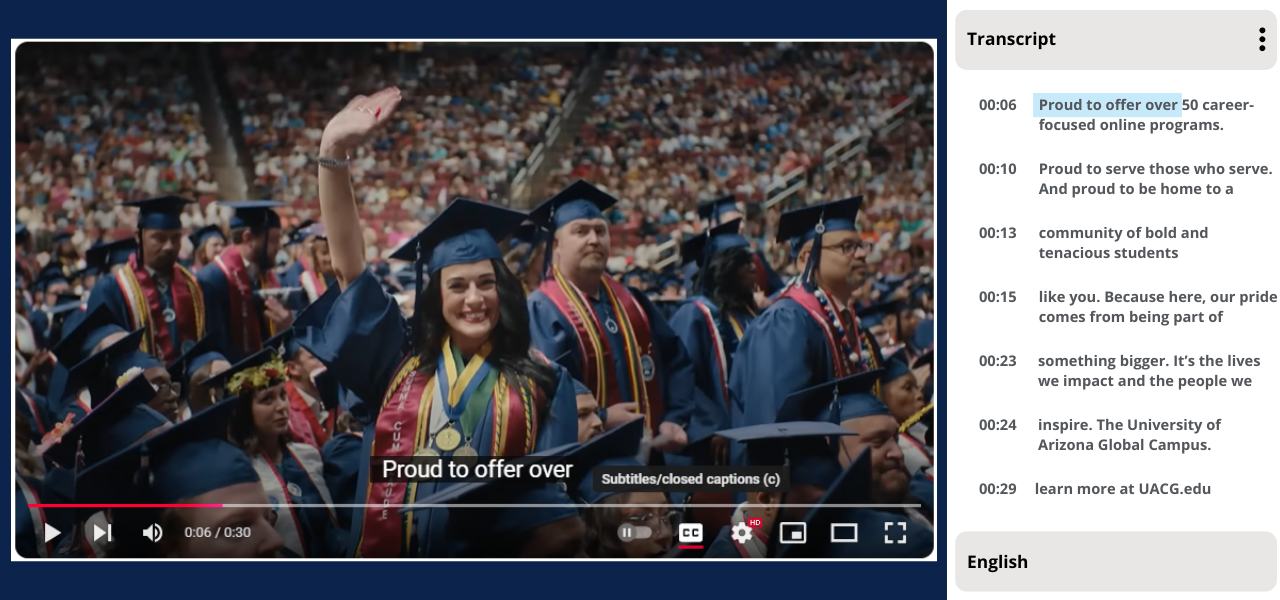
- Interactive transcripts are time-synchronized, allowing users to search for spoken audio or video. By clicking within the interactive transcripts, they can play the video from any point, and the words are usually highlighted with the progression of the video.
Benefits of using a transcript include:
- Enhancing accessibility, note-taking, and flexibility in studying.
- Raising participation and improving study habits.
- Improving comprehension.
- Making content instantly actionable.
- Generating searchable notes.
What Is Needed for Transcripts to Meet Accessibility Criteria
External videos require a descriptive transcript unless it is a talking head video (meaning that all information is conveyed through the audio). If you create the video or link to a video, a review is needed to ensure a transcript is available and meets UAGC Video Guidelines:
- Transcripts need to reflect proper grammar, capitalization, and punctuation rules.
- Transcripts cannot omit any spoken words.
- Transcripts must include non-spoken references (words on the screen, narrator changes, etc.).
- Auto transcription via YouTube and other commonly used video platforms frequently contains errors and will not meet all the criteria. As automatic transcripts might misrepresent the spoken content, you should always review autogenerated transcripts to ensure proper transcription.
When Are Transcripts Required
In most instances, multimedia content should include a transcript. A descriptive transcript is needed if items are present in the video but not in the audio. Audio- only content (e.g., a podcast) also requires a transcript.
Use the chart and questions below to find what type of transcription is needed.
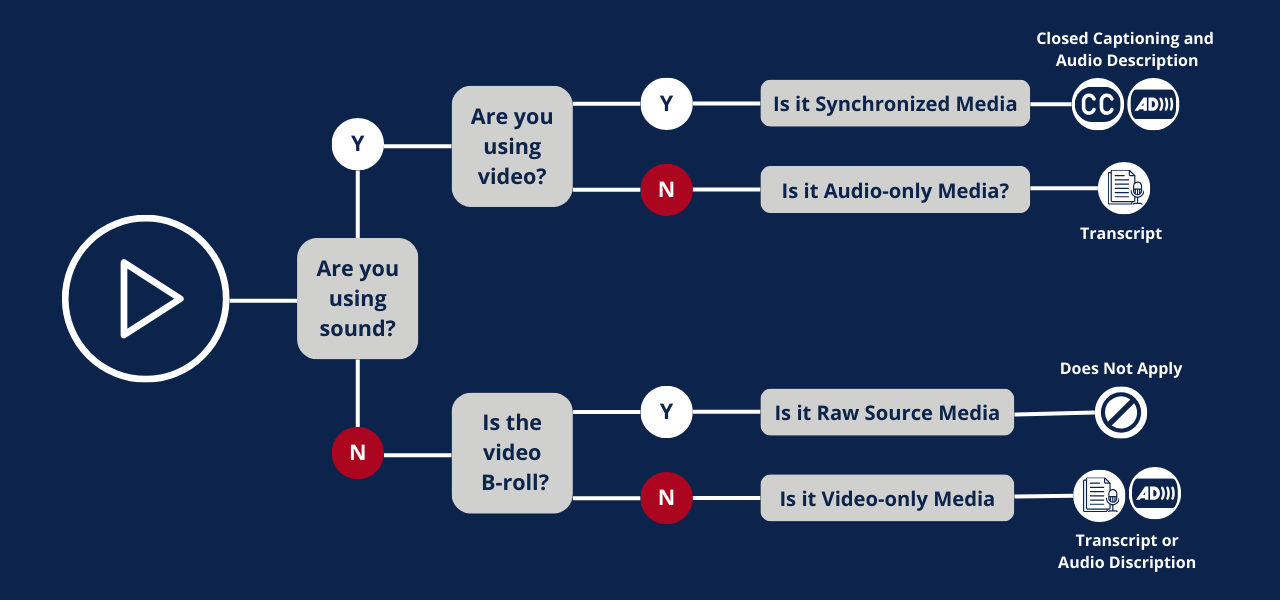
Media requiring captioning and descriptive transcripts
- Does your media use sound?
- Does your media use video?
If you answered yes to all questions, your media is Synchronized and requires Captioning and Descriptive transcripts to be accessible.
Media that requires a transcript
- Does your media use sound?
- Is the media only a sound component? No visuals?
If you answered yes to all the questions, your media is Audio only and requires a transcript to be accessible, such as podcasts.
- Media that requires a descriptive transcript
- Does your media use sound?
Is your video supplemental, known as B-roll? (e.g., photos, items secondary to primary footage that add visual definition).
If you answered no to all the questions, your media is Video only and requires a Descriptive Transcript to be accessible.
Additional Questions
- Are captions and transcripts available?
- Do captions appear at the same time as the spoken text?
- Can captions be turned off and turned on with the keyboard?
- Is the captioning on the screen long enough to provide an adequate time to read?
- Do captions and transcription have capitalization, grammar, or spelling errors?
- Does the closed captioning and transcription omit words? If yes, the words must be present on the screen.
- Is a transcript available? If visuals are present, are the descriptions or items represented in the transcript?
If you answered no to any of the questions, the media is not accessible. Please get in touch with your Academic Quality Assurance team for assistance.
What Can I Do If Transcription Does Not Meet Requirements
Everything, including all audio and visual information, needs to be in a transcript, which is essential to understanding the information presented. If the video does not meet policy and is not owned by you, please contact Academic Quality Assurance for assistance in obtaining permission from the video owner to make changes to the transcription or provide permission to edit the transcription. UAGC Faculty, please make sure you use the Jira ticketing system for all Video Accessibility reviews.
Steps to Make an Accessible Transcript
Step 1: Ensure you have written permission from the rights-holder (e.g., if the video was created by another instructor, a student, or a company). Some copyright licenses do not permit others to alter the material in any way, and that includes transcripts. Please reach out to Academic Quality Assurance for permission to edit or alter a video that was not created by you.
Step 2: Use one of the following methods to create a transcript from an existing video.
Steps to Create a Transcript
- Open a New Document
- Start MS Word:
- Open Microsoft Word on your computer.
- Select “Blank Document” to create a new file.
- Shortcut: Use Ctrl + N (Cmd + N on Mac) to quickly create a new document.
- Start MS Word:
- Set Up Your Document
- Page Layout:
- Go to the “Layout” tab.
- Set your margins to “Normal” (1 inch on all sides) or customize as needed.
- Choose portrait orientation (default).
- Shortcut: Use Alt + P and then M to quickly access Page Layout and
- Font Settings:
- Use a clear, readable font like Arial, Calibri, or Aptos.
- Set the font size to 12 pt for regular text.
- Use larger font sizes (e.g., 14 pt) for headings if necessary.
- Shortcut: Use Ctrl + D
- Page Layout:
- Transcribe the Audio/Video Content
- Using MS Word’s Dictate Function for speech-to-text
- Activate Dictate and your video or audio source
- Go to the “Home” tab in the Word ribbon.
- Click on the Dictate icon (a microphone symbol). The Dictate feature will start listening for sound. Shortcut: Use Alt + H + D
- Play your audio or video, and you should see text display within your document. Note: You can play the audio/video source on another device, such as a phone, tablet, etc., and set the device close to the source you are running your word processing program on for best results.
- Activate Dictate and your video or audio source
- Manually
- Listen to the Content:
- Play the audio or video file. Pause frequently to type what you hear.
- Type the Transcript:
- Speaker Identification: Label each speaker when they start talking (e.g., Speaker 1:).
- Verbatim Text: Type exactly what is said, including pauses and filler words if necessary for context.
- Timestamps (Optional): Include timestamps at key points or when the speaker changes (e.g., [00:03:45]).
- Listen to the Content:
- Using MS Word’s Dictate Function for speech-to-text
- Format Your Transcript
- Headings:
- Use headings to separate sections (e.g., Introduction, Main Content, Q&A).
- Shortcut: Use Ctrl + Alt +(the number of the heading 1, 2, 3)
- Speaker Labels:
- Bold the speaker labels to differentiate them from the spoken text (e.g., Speaker 1:).
- Shortcut: Use Ctrl + B (Command + B for Mac).
- Spacing:
- Use single or 1.15 line spacing for readability.
- Add a blank line between paragraphs or when a new speaker begins.
- Shortcut: Use Alt + H and then P (Command + H and then P for Mac).
- Headings:
- Proofread and Edit
- Accuracy Check:
- Listen to the audio or video again to ensure all content is accurately captured.
- Spelling and Grammar:
- Use MS Word’s spelling and grammar check tool to catch errors. Note: Do not change the words spoken in the video.
- Shortcut: Use F7.
- Readability:
- Ensure the transcript is easy to read, with clear speaker labels and consistent formatting.
- Accuracy Check:
- Final Touches
- Run the Accessibility Checker. Shortcut: Use Alt + R, and then A.
- Save and Export:
- Save your document in Word format.
- Optionally, export the document as a PDF for easy sharing: Go to “File” > “Save As” > Choose “PDF”.
- Add a title at the top of the document, such as “Transcript of [Video/Audio Title]”.
- Shortcut: Use Ctrl + S (Cmd + S on Mac).
- PDF Meta Information (Optional):
- Include the date of transcription, the transcriber’s name, keywords, and other relevant details.
Transcript Examples
Example 1-Descriptive Transcript ABS300
Example 2-Descriptive Transcript BUS600
Step 3: The transcript should be available with the video or audio. The best practice is to place a hyperlink to the transcript directly below the accompanying audio or video labeled Transcript - “Title of the Video.”
Preparing Visuals to Be Incorporated Into Captions and Transcripts
Include Sounds in Transcript
When authoring transcripts for accessibility purposes, include text for all spoken audio, including meaningful sounds. Ask yourself: Does leaving this sound out change the story, lesson, or experience? The writer must use their judgment.
For example, should you indicate in captions/transcript that someone has coughed?
- A student is speaking at a commencement address and pauses to cough—it is unnecessary to include.
- A character in a play coughs because it foreshadows an oncoming illness—this is essential to the story and needs to be included.
Including Visuals in Transcript Tips
Include visual descriptions for people who cannot see the screen but may have assistive technology read the transcript.
- Include images and text appearing on screen, as appropriate.
- Details: You do not need to go overboard with details such as what a person is wearing (unless it is part of a plot point) or that a person is pointing with their right hand instead of their left. You want to get any meaningful visual changes across. If it impacts the story or improves the clarity of a lecture, include it. If the dialogue covers the text on screen, you do not need to repeat it.
Visuals contain essential information needed to understand the presentation's message or theme. If the visual information in your multimedia is critical to understanding the content, the narrator must describe it, or a descriptive transcript will be needed. If described by the narrator, it will then be automatically included if you use autogenerated closed captioning and transcription, such as YouTube.
The best way to do this is to incorporate visual descriptions directly into your dialogue. You can do this by these methods:
- Describe text or visuals rather than assuming the viewer will read or see the screen alone. Audibly describing the items will display the text in closed captioning and the YouTube autogenerated transcript. If not spoken, the information will not be included and may be missed by the audience.
- Write as if you are a radio sportscaster. Radio sportscasters provide detailed narration, describing the important aspects of actions that occur because their audience can’t see what’s happening. If you close your eyes, would you be able to understand your entire video, or would you need additional information to understand everything? The more you provide, the less need for audio description in a descriptive transcript.
- Identify the speaker and other key changes. Speakers need to be addressed in transcripts. If the narration changes and a new speaker comes onto the screen and is only identified by onscreen text (e.g., John Smith, Expert Photographer), this must be noted in a descriptive transcript. How would you know who was speaking if you could not see the screen text? Add in language that identifies the speaker and when speakers change. (e.g., John Smith, Expert Photographer, will explain camera lighting techniques…)
- Avoid vague language. For example, instead of saying, “When I click this,” say, “When I select the Save button.”
- Read important text that appears on the screen aloud. This includes title slides at the beginning of a video, scene or topic change, and lists displayed during the video.
- Focus on the important elements of the visual information. Describing every aspect of the visual is unnecessary—only describe the parts pertinent to the topic.
WCAG 2.1 Success Criteria
The issues described on this page map to the following success criteria in the W3C’s Web Content Accessibility Guidelines (WCAG) 2.1:
- 1.2 Time-based Media (Level A)
- 1.2.1 Audio-only and Video-only (Prerecorded) (Level A)
- 1.2.2 Captions (Prerecorded) (Level A)
- 1.2.3 Audio Descriptions or Media Alternative (Prerecorded) (Level A)
- 1.2.4 Captions (Live) (Level AA)
- 1.2.5 Audio Description (Prerecorded) (Level AA)
- 1.2.6 Sign Language (Prerecorded) (Level AAA)
- 1.2.7 Extended Audio Description (Prerecorded) (Level AAA)
- 1.2.8 Media Alternative (Prerecorded) (Level AAA)
- 1.2.9 Audio-only (Live) (Level AAA)